


Four Factors for Flooring Success
Part 2: Floor Preparation
By Grant Loyd
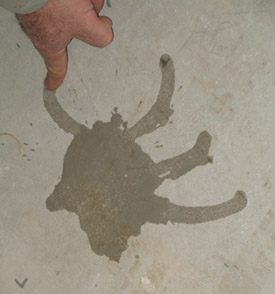
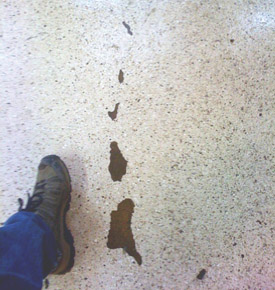
Check if concrete is absorbent by putting
a small amount of water on it
and see if it soaks in.
Okay, repeat after me: “FLOOR PREP.” Say it again, and louder this time: “FLOOR PREP.” And again: “WE LOVE FLOOR PREP."
No, you don’t. Nobody loves floor prep - not flooring installers nor do-it-yourselfers. We hope we can slide by without it. Often purveyors of products minimize floor prep requirements so their product sounds easy to apply, thereby enticing all of us who hate floor prep to flock to their easily applied product.
Based on my experience, neglecting adequate floor prep is the most common single cause for flooring failures. Even if you buy the best product available, apply it correctly, and maintain it properly, you will have a high probability of a major flooring catastrophe if the issue of floor prep is not sufficiently addressed.
Beyond the common desire to have something be easy, which some advertisers purposefully exploit, there are several situations encountered in pet care facilities, which contribute to bad decisions regarding necessary floor prep. If you find yourself in any of these situations, it is wise to consider it a “red flag” and be diligent to find out what specific prep work should be done.
Floor Prep “Red Flag” Situations
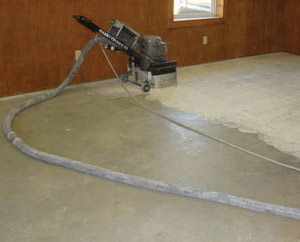
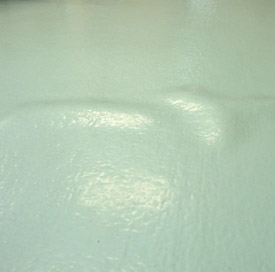
Notice the light reflecting off the floor. The floor looked great, but due to excessive smoothness and presence of a sealer, it needed to be prepped by diamond grinding. The lighter portion shows how a prepped floor should look.
- Fast-track construction schedules – Many flooring options should not be installed on fresh concrete. Instead, waiting 28 days after concrete is placed before installing floor treatments is usually recommended. In a sense, this waiting period can be seen as a part of the “prep.”
- All situations where the floor owner is looking for or getting the “low bid” – If you don’t pay for floor prep, it will NOT be done. Floor prep is where “low bidders” skimp so they can make a profit in spite of not charging enough for the job.
- When leasing a building to convert to animal care use – Leases are often signed before a thorough flooring analysis is done.
- When planning a new floor treatment to be installed on “new” concrete – The concrete finisher may not be specifically instructed how to finish the slab. Concrete finishers like to make the slab look good. Their preferred result often is not what is required for flooring installations.
- When planning a revision, rehabilitation, or correction of a previous floor treatment
- Any time you are operating on a “tight schedule” – e.g. you have to open a facility by a certain date or you have dogs scheduled with a short time window to complete flooring work.
- Any time you are planning a floor treatment installation and you do not have detailed assessment information about absorbency, presence of all previous treatments including possible use of curing agents when concrete was initially placed, moisture vapor emission rates, surface defects including cracks and joints, and evaluation of surface profile as related to type of floor you want.
- Now that’s a pretty long list. Unfortunately, space does not permit discussing each of the above situations. The best advice is this: If any of the above situations apply to you when considering flooring, make sure you do your due diligence to find out specifically what is required. If you are getting bids to have the work done, insist that the contractor give you a detailed run down of exactly what prep work will be done and why it is needed.
Typical Reasons (Excuses) for Inadequate Floor Prep
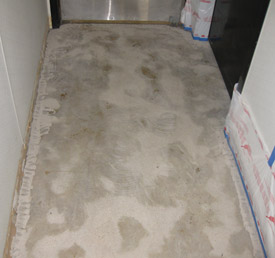
This floor was prepped using a diamond grinder and a four-inch grinder around the edges. However, the surface was not evenly done, leaving some darker and lighter areas.
Floor failures due to improper preparations are usually caused by lack of knowledge about what should be done or attempts to save time or money. Let’s briefly look at these issues.
First, if you are not familiar with what prep needs to be done, you must verify the advice you get as you educate yourself on this issue. Just in the last couple of months, I encountered two situations in which manufacturers of products had given incorrect information about floor prep to kennel owners who then experienced catastrophic failures. Specifically, customers were told to prep the floors using muriatic acid even though the customers said they had told the manufacturers that there was an existing sealer on the floor. Both situations resulted in delamination and failure, just as you should expect, since muriatic acid etching only affects bare concrete by dissolving lime. Acid etching cannot remove any previous sealers or surface contaminations. Guess who gets left holding the ball. So verify and get more than one opinion regarding prep work.
The other reason adequate prep is neglected is to save time or money. This usually is a “penny wise, pound foolish” decision. Often people who contact me for advice are under extreme pressure to get floors done in the shortest time possible. With new facilities, the target opening date often gets pushed back, and there is pressure to open and start bringing in money. With existing facilities, it is hard to set aside time to get flooring work done when dogs are not present. Basically, owners of boarding and daycare operations face very strong pressures of time and money. Those real pressures, combined with a lack of knowledge about the critical nature of floor prep, work in a powerful way so that owners often choose to try and get by without adequate prep.
Insufficient prep work resulted in a terrible-looking stained floor. While the prep results shown in the previous picture may have been okay for a solid floor coating, it was not sufficient for a translucent stained system.
If you find yourself in a time or money crunch - or both - when you are planning floor work, just step back from the pressure. Do a little math and look at probable/possible outcomes resulting from inadequate versus adequate prep.
Figure out the square-foot price of materials and labor and the square-foot price of a good prep job. Figure out the time savings if you skip prep, and then calculate how much money you get as income by neglecting prep work. Now if you don’t spend that “extra” amount on prep, how much extra money will you make by getting into service quicker? Add it all together.
What happens if the floor fails and you have to close down to correct it? How long will it take? How much will it cost? What will it cost to pay employees during the time you cannot accept customers? What was your loss on initial materials and labor? What is the “lifetime” value of a customer you might lose because you had to shut down and couldn’t keep their dog so they could go to work?
Here is the point: not doing prudent prep work can have catastrophic results. It will almost always cost you much more than you thought you were saving in time or money.
As a general rule, prep work for flooring jobs should make up about 70% of the total time from start to finish. When you are planning floor budgets, make sure to include money for adequate surface prep. It is almost always better – cheaper and quicker – to “bite the bullet” and do it right the first time.
The Desired Result of Floor Prep
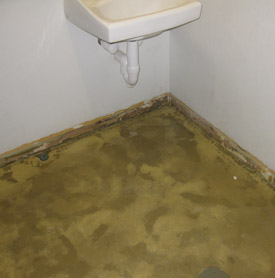
The failure to do moisture testing as part of the prep work can result in long bubbles.
Different types of flooring options require differing degrees of floor prep. Therefore, what must be done in terms of floor prep should be evaluated according to the specific type of floor being installed. A common comment I hear is “The floor looks pretty good.” That is not a sufficient criterion to determine what prep should be done.
In general terms, concrete should meet the following conditions prior to installing a new floor treatment:
- Free of all previous sealers, coatings, adhesives, and contaminants
- Concrete “dusting” should be minimized, and laitance (the weak surface layer of concrete) should be removed.
- Cracks, joints, and surface defects should be cleaned out and properly filled according to the specific requirements of the new floor option.
- Moisture vapor emission rate (MVER) should be evaluated and be within the limits required by the flooring choice. MVER refers to moisture coming up from below into the slab and out the top side of a surface.
- The surface profile or texture (rough or smooth) should be appropriate for the expected floor treatment.
- The surface should accept or absorb water.
- Dust should be removed with a vacuum.
- The surface should appear as even or consistent as possible.
Concrete prep work is indeed a bigger issue than most people imagine. Hence, insufficient budgeting and time allotments plague chances of a good job and severely increase the risks of flooring failures. Keep the 70% rule in mind. Take the time to evaluate carefully the starting condition of your concrete floor, and assess what should be done for prep work. While almost no one really likes floor prep, doing it right is a gift that keeps on giving.
Some Tips
This peeling chip epoxy floor was contaminated with motor oil that was not properly removed during prep.
Hopefully, this brief article will alert you to the critical importance of floor prep, and you will be encouraged to explore the topic further. Here are a few things to keep in mind as you think about prepping concrete floors.
- You can’t always tell just by looking at a floor. Often floors that look the best may need intensive prep. Very smooth power-troweled floors or floors with previously applied curing agents or sealers may look great but are probably non-absorbent and too slick for applying floor treatments.
- Etching with muriatic acid will not remove previous coatings, sealers, or contaminants. Acid only works on bare concrete surfaces. The majority of “eco” etchers do not work very well.
- Using chemical strippers to remove coatings or sealers is not the best plan. When you emulsify or soften the unwanted material, it tends to soak further into the concrete, leaving a contaminating residue.
- There is not a “one size fits all” solution to floor prep or removing previous coatings/sealers. Before doing the whole floor, it is best to do small sample areas. Test for absorbency by putting a small amount of water on the floor to see if what you did resulted in making the concrete absorbent. If not, do more test areas until you end up with a clean area that will absorb water; then go ahead and do the whole floor after you know what works.
- In general, floor prep is done most efficiently and thoroughly using diamond grinders with vacuums attached. You will likely use a larger grinder for main surfaces and an edging tool for detailing.
- Shot blasting can be an effective way to remove coatings and profile floors. They tend to leave overlapping areas known as “corn rows,” which can be visible through thinner coatings (i.e. less than 10 mils). Sometimes grinding should be done after shot blasting to produce the desired profile.
- Different types of floor treatments require different degrees of prep. Make sure the specific prep details are appropriate for the specific floor treatment you want.
- If you do not do sufficient floor prep initially, the risk of losing many times the amount of money and time goes way up.
Grant Loyd is the owner of DogKennelFloors.com and SolvingConcreteProblems.com. He has specialized in animal care facility flooring for 11 years and in concrete protection, including decorative concrete options and coatings, for 20 years.