


Working Together: Kennels, Floors, and Drains
By Greg Taylor
Appropriate kennels, flooring, and drains are critical to ensuring a boarding facility looks its best while also maintaining proper sanitation. The reality is that kennels, floors, and drains are the most abused parts of a boarding facility. These areas are constantly washed – often with high-pressure hoses – and subjected to harsh chemicals, yet it can still be a challenge to ensure they are always thoroughly cleaned. They are also battered by equipment and scratched and clawed by their four-legged guests.
It is worthwhile to invest the time to integrate floors, drains, and kennels so they work together effectively and efficiently for the long-term. Fluid and contaminants migrating between kennel runs can lead to disease outbreaks. Cross-contamination puts the health of animals at risk and can result in the need to shut down and disinfect the facility, not to mention all the related bad publicity.
Two of the most common integration issues that can cause significant problems for boarding facilities are poor workmanship on the floors, and how to account for coving, as discussed below.
Workmanship: Quality Matters
In general, there are three primary areas of concern caused by poor workmanship on a facility’s floor when integrating the floor with kennels and drains:
(a) Poorly poured floors, which can create waves or gaps beneath side panels resulting in channels for cross contamination between runs. Silicone is often used to fill these gaps but it will degrade over time.
(b) Poorly cut or poured trench drains that lead to drain and disease issues.
(c) Poorly prepared floors, which can cause epoxy to bubble and chip and result in the kennels not fitting properly.
Coving: Fit Counts

Coving is another common integration issue seen in facilities. For those not familiar with it, here is quick primer on coving:
Most floors join a wall at a 90-degree angle. Coving is when the 90-degree angle has been modified to have a radius (sort of a half circle) at the juncture so the water can’t puddle at the joint. There is nothing wrong with coving; in fact, coving is a great solution to make the water run away from the 90-degree angle. Coving will create easier cleaning and less disease because bacteria thrives in wet or damp places – such as wall joints where there is a 90-degree angle.
Coving, however, creates challenges with fitting kennels tightly to the back wall. Coving forces the kennel isolation panel away from the wall by the width of the cove so there is not a tight fit to the back wall. Instead, there will be gaps that will require attention in order to prevent cross contamination. Silicone and/or metal angle can be used to fill the gap, but this isn’t an attractive solution.
As previously mentioned, there is nothing wrong with coving. In fact, it is a great way – even the preferred way – to design a kennel room floor. There are also ways to modify the kennels or floor to have them integrate with the coving. The kennel manufacturer can cut the back of the isolation panel to match the cove, additional filler parts to account for the coving can be made and shipped with the order, and the epoxy can even be chipped out to make a notch for the isolation panel to fit in (although this may void the epoxy warranty).
The problem arises when the kennel manufacturer is not aware there is coving and ships product that won’t fit. Make sure to inform your kennel manufacturer if you plan to use coving and discuss different solutions with them so everything is integrated, fits, and works together.
Floor Seals: Prevent Cross-Contamination
Regarding the issue of bad floors, any floors that are sloped are going to be imperfect. The more slope directions, the more imperfect the floors will be – meaning the more gaps, small waves, and imperfections they will contain and the more likely the isolation panels will not fit properly. An isolation panel on a floor with a constant slope will fit properly, but if the slope changes then the rigid metal bottom of the panel will lie above the little valleys formed by the imperfections. These gaps or valleys will need to be filled in with silicone, but the silicone will wear out and degrade over time, especially if pressure washers and/or harsh chemicals are used.
Facility staff may have the best intentions to recaulk the silicone, but the reality is that this routine maintenance rarely happens. In addition, if a floor slopes, the isolation panels need to adjust to the floor slope or they will not be level at the top of the runs. There are several types of floor seals used today that try to combat these issues with varying degrees of compromise and success.
Types of floor seals include:
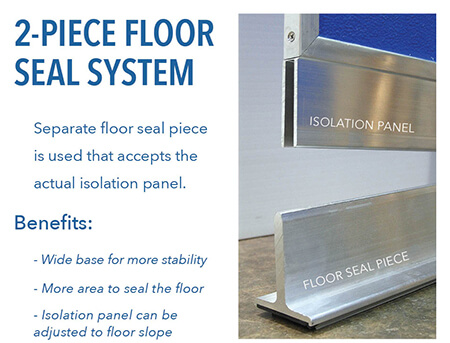
• 2-Piece Systems – With a 2-piece system, a separate floor seal piece is used that accepts the actual isolation panel. The biggest benefit to this approach is that the floor seal itself is typically around 3” wide, which is much wider than the panel itself, which is typically only ½” to 1” thick. This wide base offers more stability and more area to seal to the floor. This approach also allows the actual isolation panel to be adjusted for the floor slope, as detailed in the 2-piece floor seal system image.
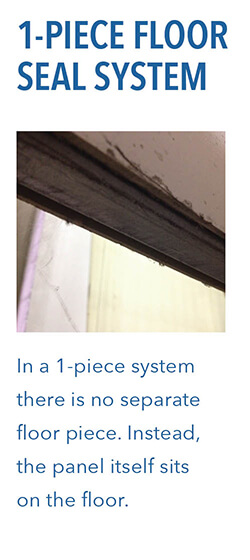
• 1-Piece System – In a 1-piece system there is no separate floor piece. Instead, the panel itself sits on the floor. The biggest advantage here is cost because there is no separate floor piece. However, there are disadvantages. For example, because the panel itself is only about ½” to 1” thick, the actual floor seal is smaller and less stable than the larger ones available with a 2-piece system. Additionally, because there is no separate floor piece, the panel itself must be cut at an angle to fit the slope of the floor. This means it is imperative that the floor slope changes be communicated to the manufacturer in order to avoid issues with how it is installed on the floor.
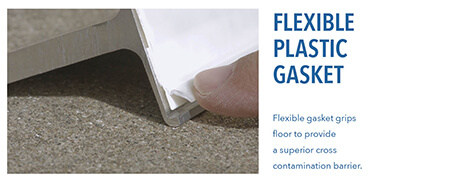
New Floor Seals – Fortunately, there are some new floor seals that advance cross-contamination barriers. These new seals help prevent liquid from flowing between two runs by using a 2-piece system that also has a flexible plastic gasket underneath the floor piece. This gasket gets pressed on by the weight of the isolation panel and conforms to and grips the floor’s surface and imperfections as they develop over time. It also prevents cross-contamination even when the primary bead of floor sealant has been breached or where there are cracks, waves, irregularities, or other imperfections in the floor.
Kennel Room Design:
Impact on Floors
There are a variety of flooring options to consider related to the kennel design. The choice of kennel room layout can impact how floors and kennels work together. For example, some layouts increase the chance of needing spikes through the isolation panel floor seal into the facility floor, which can void the floor warranty and/or create issues with radiant heated floors. Other layouts can create issues with drains and slopes and how the kennels and floors work together.
Free Standing Runs
These are runs where it is possible to walk completely around them; that is, they are not attached to any side wall or back wall at any juncture. The most common type of free standing runs are back-to-back configurations in the middle of a room. In this situation, there is not a solid anchor point (or better yet, two anchor points) where the kennels can attach and gain stability. This increases the chance they may rock or sway, and it may be necessary to pin the isolation panels to the floor by way of a rawl spike. This may void an epoxy floor warranty or create issues with radiant heated floors.
Glass and Bottom Frame
Kennel gates can come with or without a bottom frame. No bottom frame can increase the need for spikes because they will not be as stable. On the other hand, it is harder to clean a run when the gate has a bottom frame because it serves as an obstacle to the hoses and mops. Glass gates also increase the need for spikes because they are particularly heavy and can lead to sagging. The best approach is to find a way to anchor into at least one side wall, or the back wall – both if possible!
Double Sloped Runs and Drain Placement
Some kennel room designs employ a trench drain offset from the back wall by about 6”. When the run slopes from the front to the back drain and from the back wall to the drain, it is called a double slope. There is nothing wrong with this approach; in fact, it has a lot of benefits, but this floor layout does create issues when integrating the kennels. More specifically, the isolation panels need to slope two different directions: in this example, front-to-back and then back-to-front. The kennel manufacturer can adjust and account for this double slope but need to be informed of the situation so they can correctly design the runs. Otherwise, the kennels will not fit properly to the floor slope and cross contamination can be a problem. The answer to this potential problem, like many related to integration, is to over communicate with the team of service providers and kennel manufacturer.
Kennel floors, drains, and housing are significant investments, and it pays to make certain they work together. The flooring and kennels are critical in designing and operating a clean, disease free facility, and mistakes can be a prescription for financial disaster. Think about how the different parts work together and enjoy the rewards.
Greg Taylor is the CEO of the Mason Company. Since 1892, Mason Company is the recognized leader in designing and manufacturing animal enclosures. Mason Company offers the broadest product line in the industry, including isolation panels and gates in a variety of materials, cat condos, cat towers, fiberglass cages, accessories, and more for any animal application. Visit www.MasonCo.com, contact [email protected] or call toll-free 800-543-5567.